Hello my dear friends,
I have been working hard these past days making this tutorial on how to create my felted birds nest. This is a general tutorial, meaning that the outcome of each individual piece can/will be different. It depends on how much lambswool content your sweater has, how long you work with your piece, how hot the water is and how you dry your piece - all these factors have a big role in how big your nest will be and the overall look of it.
This is what you will need to make the nest:
- Old lambswool sweater (mine was 100 % lambswool)
- Three different textured types of wool
- A large, thick needle
- A strong thread and sewing needle
- Scissors
- A ruler
I chose different textures and shades of brown for my wool, so the look that you will get isn't too uniformal and more realistic looking. You are trying to achieve the look of branches, twigs and other things that you would find in a real nest.
Depending on the length of the sweater arm you use, your nest will either be larger or smaller. Whilst you felt your piece it will shrink and also during the drying it might shrink a bit more, it really is something you cannot control very much. For the nest, cut off the cuff on one of the arms. For a larger nest, cut a length of about 11 inches for the arm and for a smaller nest only use about 8 inches of the arm.
Using your strong thread - I used upholstery thread - sew a running/gathering stitch about 1/4 inch along both ends of the piece of sweater.
Then pull the thread tightly at one end, knot it off and cut the ends. ( If the arm isn't the same width on both ends use the smaller end for the inside of the nest)
Pull the thread tight and knot it off at the other end of the tube and stuff the seam allowance inside the tube (this is the bottom outside of the nest), but do not cut the thread yet.
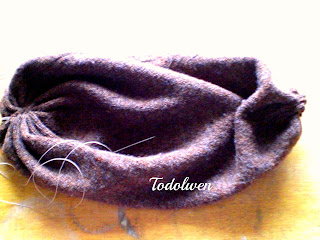
Push the one end into the tube forming a sort of bowl shape and sew it together in the center going through both layers of the sweater, knot it off and cut thread.
This is what your nest should look like so far.
The next step is to embellish your nest. Cut a long strand of one of the wools and using your large, thick needle sew a running stitch around your nest.
When you get to the top of your nest, stitch over the edge with your wool. Now using the other types of wool do the same. You can use a much or as little as you would like, it's all up to you.
You are looking to make you nest to look natural and rustic, something close to the real thing.
And now the work really starts ...
How to felt...
You will need:
- A sink or pail
- Hot water
- Liquid dish soap
- Rubber gloves
...and good old elbow grease!
Fill your sink/pail with hot water high enough to cover your nest and put about 1 teaspoon of liquid dish soap in. (Please be careful because the water has to be hot, but not too hot that it will burn you so don't use water that has just boiled!!)
Drop your nest into the soapy water and start working it - don't forget your rubber gloves! You can almost do anything to it - kneed it, rub it against the bottom of the sink/pail or work it between your hands. You need to agitate the wool to make it turn into felt. Every so often take it out of water and check how it looks. You can also run it under the cold tap in between - this will help the felting process - and then return it back into the hot water and work it again. It takes me about 30 minutes to get the result I am looking for.

Once you like the look of your nest, take it out of the hot water and rinse it under the cold tap. Now you just have to dry it. I normally put mine on top of the heating outlet in my dinning room and let it dry over night. You could also use the tumble dryer, but that would end up costing too much just for one nest. If you would like it to stay a certain shape then you can scrunch a piece of newspaper into a ball and stuff it into the nest, if doing this you cannot use the dryer - fire hazzard!!)
Your nest is done and if you like you can add a few feathers for a more realistic look. Now the only thing for you to do is find some little eggs, a wee bird or another little critter to place in it!
And last but not least ...
I designed this wee fellow a few days ago with the thought of another tutorial for you, but I am not too sure whether or not I like the way it turned out. What do you think?? Please drop me a line and tell me your thoughts on this little bird!
Have a peaceful and creative day,
Karen B.


